Welcome to the first of our creative maestro’s video design tricks
Hey all! I’m Agus, Co-Founder and Art Director here at Wideo. I want you guys to maximise what you can make with Wideo and make your videos the best they can be, so I’m going to start letting you in on some video design tricks and secrets right here in our blog.
Agus Esperón Wideo.co Co Founder & Head of UX/Design ![]() @agustinesperon
@agustinesperon
Add cool filters and textures to your Wideo now!
Today I wanted to kick things off by showing you something brand new, fresh out of the kitchen.
You don’t always have to wait until our developers finish their backend code to enjoy some of our cool upcoming features. Here, fresh out of our kitchen, you can get your hands on some awesome new visual styles for your Wideos before they even reach the front end of the site.
Check out these tests i’ve done to see how the filters work and how they can enrich the look of your wideos:
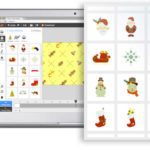
Especially for you I’ve designed 7 different climatic png files that will work like Instagram filters over your Wideo scenes and I’d love you to have a play with them.
You can download the special texture package HERE
Now, once you’ve downloaded the package, unzip it, and either click edit in any of your existing Wideos or create a new one and follow these 3 easy steps steps:
1. Click the upload button in the left sided toolbar and select the TEXTURE that you want to start enjoying.

NOTE: As with any image uploaded to Wideo, it is automatically placed in the centre of your scene. I’ve made the dimensions 1920×1080 px so you won’t have to worry about its size or proportions, they will fit perfectly.

2. Next, all you have to do is to lock this object. This acts like a filter, you want to make sure it’s not clickable or draggable so you can design and animate without the headache.
Just select it and click the lock button (check out its location in the pic below). You will be able to unlock it again whenever you want by selecting the object from the thumbnail below the timeline and clicking the unlock button.
3. You can also edit the brightness and opacity from the edit object menu, to customise it even more.

Quick last tip:
If you’re starting a Wideo from scratch at the very beginning of its creation, you can clone the first scene as many times as you want and the texture you’ve uploaded as a filter will be copied as well. If you are styling an existing Wideo, just copy and paste this texture in each scene (ctrl c/crl v) and by default it will be pasted in the very same place. One less thing to worry about.
I hope you enjoy this feature and start adding some cool finishes to your Wideos, while I carry on pushing our great developers to include this feature in our front end (another addition to their endless to-do list!).
Please do send me any feedback, examples or ideas you may have to agus@wideo.co and stay tuned to next month’s blog for some more video design tricks.
Happy wideoing..
Agus.